“With payday comes good food” – me, today.
This cheesecake was an amalgamation of a few cheesecake recipes that I have tried out, combined with some good old trial and error. It can therefore be adapted to any type of cheesecake just by switching out the Baileys for something else. The jelly layer on top can be a bit of a faff and so, if you can’t be bothered with it, it is just as good without it.
Ingredients:
Base
– 250g Dark chocolate digestives (49p/Aldi)
– 90g Salted butter (99p/Farmfoods)
– 10ml ‘Baileys’ (okay, I actually used Aldi’s version which cost £3.75 for 700ml!!)
Topping
– 250g Mascarpone (£0.79p/Aldi)
– 200g Soft cheese (£0.59p/Aldi)
– 80ml Double cream (£0.89/Aldi)
– 50ml Baileys (again, Aldi to the rescue)
-120g Icing sugar (£0.69p/Aldi)
For the jelly layer:
– 2-4tsp Instant coffee (I used Nescafe Azera, but any instant coffee will do)
– 3.5g Vege Gel (or normal gelatine for non-veggies) (£1.20/Tesco)
– 100ml Baileys
The total cost of making this for me came in at £9.39. Depending on your appetite, this recipe serves approx. 12 decent slabs, bringing it to £0.78p/slice.
Method:
1. Start by bashing up the biscuits in a medium sized mixing bowl until they are fine and crumbly.
I was given a hand-operated vegetable chopper for my birthday one year which I now use extensively! (Link at the end of this recipe) I used it here to get my biscuits really crumbly however they can easily just be bashed up by sticking them in a food bag and using the bottle of cream liquor to whack them with.
2. Measure out the butter into a small microwaveable bowl and microwave it for approx 30 seconds until melted. Add the baileys to the mixture and stir before pouring over the crumbled biscuits.
(If you don’t want to use the baileys here, use 100g of butter instead – for a crumblier base, use the 90g of butter and just forgo the baileys altogether. )
4. Mix the butter into the biscuits until it just about comes together and forms a crumbly pile in the bowl. Ensure no dry mix is left behind – a good, solid foundation will stop a cheesecake avalanche later on…
3. Line a baking tray with baking paper, or grease the sides well with butter.
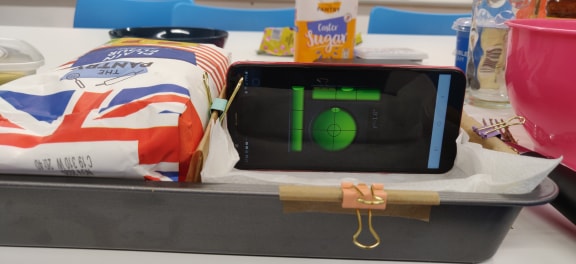
You can make this in whatever receptacle it will fit in that you have available. A deep roasting tin I nicked from a well-prepared flatmate was my weapon of choice – I used a piece of cardboard to partition the tin, creating an area of 5.5×5.5″ and used a bag of flour to keep it all stable. (This will fit, approximately, a 6.5 inch round tin.) If using a round tin, one with a removable bottom works well, especially if you want an Instagram worthy creation, but really it doesn’t mater much because it will taste nice).
4. Press the biscuit mix into your tin or tray. Make sure it fills the corners and no gaps are left behind. Use a flat object wrapped in a piece of kitchen towel (and no, you can’t use loo roll here) to flatten it into the tin.
I used a combination of a jar and a serving spoon to flatten mine. Being an engineering student, I took this one step further and got a spirit level out to make sure the base was entirely flat and even – you can do this but your flatmates will probably laugh at you.
(Note the cowboy cheesecake tin here!)
5. Put the base into the fridge to set.
If you’re living in student halls, a good trick is to wait for a flatmate to go home for the weekend and take advantage of their relatively empty shelf whilst they’re gone. If fridge space is an issue however, try splitting the mixture across smaller tins that can be stacked on top of each other or wedged into small spaces.
6. Whilst the base chills, stick all the ingredients for the topping into a large bowl. Mix them together well with a whisk until they come together into a thick cream. You can also use a wooden spoon if no whisk is available. You can realistically use anything you have to hand, just make sure there are no lumps.
7. Once the mixture has come together, spread it evenly over the base. I used a spatula for this but the back of a spoon or a butter knife works well too. Again, you can use anything, just get it flat.
If you are not adding the jelly layer, you can leave the topping however you want it – use a fork to make pretty patterns or just leave it looking a little rough for a textured finish. The world is your lobster.
8. Put the cheesecake in the fridge to set.
9. For the jelly topping, measure out 100ml of boiling water and add the coffee – stir until it is dissolved. I like mine to be strong so I added 4tsp but 2tsp is fine if you prefer a subtler flavour. Top up with 100ml of cold water, followed by 100ml of Bailey’s.
The vegetarian gelatine is a bit of a faff and requires the liquid to be cold so I put the mixture in the fridge for an hour or so whilst I had my dinner.
10. Once the liquid has cooled, sprinkle the ‘gelatine’ over it and then mix it in well until it dissolves. Transfer to a saucepan and heat it gently until it comes to the boil; keep stirring the whole time. Remove from the heat and place the pan in a sink filled with cold water for a few minutes. Keep whisking it throughout before spooning it over the top of the cheesecake.
The gelatine will set super quickly – I did not want to put the boiling liquid straight onto the cheesecake as it would melt it and blend the two together, preventing getting the nice clear cut line, so I put it in the sink to cool it as much as possible before adding it to the cake. A few lumps will start to form in the pan before it has all been spooned out (don’t pour it straight on as it will disturb the cheesecake layer) but I just avoided putting these on the cake. Work quickly – you will have approx 4-5 minutes between getting it off the heat and onto the cake before it starts to set and become unworkable.
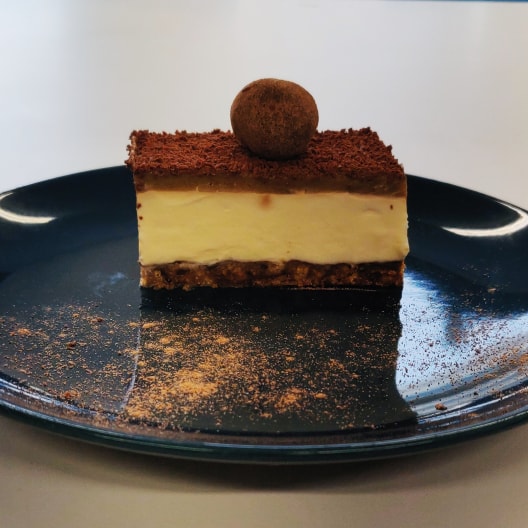
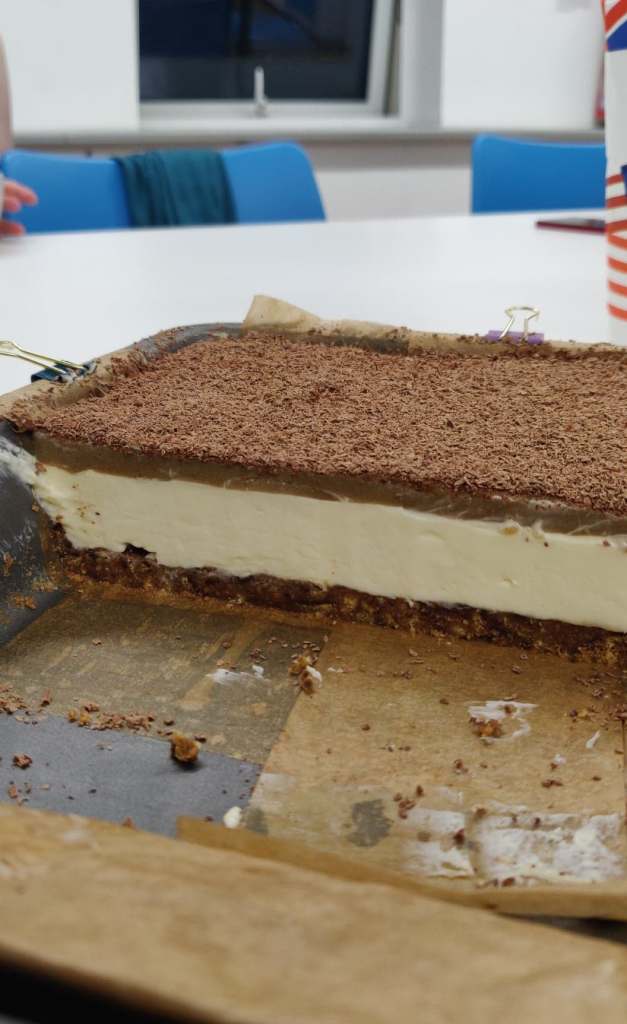
11. Put the cheesecake in the fridge for a few hours to set. Once cool, you can grate a few squares of dark chocolate over the top to finish it off before putting back in the fridge to finish setting.
12. The cake is ready to eat within an hour or two if you really can’t wait, but I found mine to be the best in terms of structure and finish the next morning (and yes, I did eat it for breakfast).
Notes: If you’re feeling really extra (or you’re seriously procrastinating), you can make some truffles to sit on top of the cake with the leftover cream and chocolate. I did this, and used the subsequent sugar rush to power through the assignment I was procrastinating.
Link to food chopper: https://www.amazon.co.uk/Appetit-Gourmet-Vegetable-Stainless-efficient/dp/B07F1JRYB3/ref=sr_1_1_sspa?crid=2VDEGVQ0O3YV9&keywords=manual+food+chopper&qid=1575113836&sprefix=manual+food+cho%2Caps%2C202&sr=8-1-spons&psc=1&spLa=ZW5jcnlwdGVkUXVhbGlmaWVyPUEzNUU3MlFaV1lLSTEzJmVuY3J5cHRlZElkPUEwODYwMjMwQkhGTFo5Mk0wRVNZJmVuY3J5cHRlZEFkSWQ9QTA2OTI4MTkyMFE4UzUyWDg5UlhZJndpZGdldE5hbWU9c3BfYXRmJmFjdGlvbj1jbGlja1JlZGlyZWN0JmRvTm90TG9nQ2xpY2s9dHJ1ZQ== (Not being paid to do this, just really love my chopper!)
Follow me on Instagram @cowboyhaggis
